Lab 2: HTML Concepts

In this lab, you will add functionality to the Web site you created in the last lab.

Objectives:

Part 1: Writing an HTML Form

Steps:

  1. Use File - Close All to close all open editing windows.

  2. Next, create a Dynamic Web project for your lab. RAD uses Dynamic Web Projects for applications that display Web pages.

    1. Choose File - New - Dynamic Web Project. On the first page of the wizard, enter:

      Project name:                Lab02Web
                       

      At the bottom, put a checkmark in the box Add project to an EAR, then set the EAR project name to Lab02EAR.

      Then press Next.

    2. On the Web Module page, note that the Context root is Lab02Web -- this will act as a prefix on the URLs for your Web pages.

      Press Finish.

      Ignore any request to switch to the Web perspective. You can also close any Quickstart window.

  3. To save time, let's copy files from the last lab. If you didn't finish the last lab, contact the instructor about how to copy from the last lab's solution.

    Follow these steps to copy:

    1. Expand the Lab01Web and nested WebContent folders.

    2. In Lab01Web/WebContent, right-click on west.html and choose Copy. Then right-click on Lab02Web/WebContent and choose Paste. You should see the file in the new Project.

      Repeat the Copy-Paste for the rest of the HTML files and the GIF file.

  4. Edit index.html by double-clicking on its entry in the Enterprise Explorer.

    Above the "Locations" heading, inside of a new paragraph, add a hyperlink to a page named orderform.html with the text Order a Pizza NOW!.

  5. Using the same technique as in the last lab, create a new page named orderform.html in the WebContent folder.

    Write the boilerplate HTML and the common content for the new page:

  6. The new page will contain an HTML form betwen the level-one heading and the horizontal rule. Start by defining the form element with an action of OrderPizza using the post HTTP method. Be sure to write the closing tag for the form.

  7. Now you can complete the form definition. Follow these steps to insert user-input widgets within the form:

    1. Inside of a paragraph (within the form), write the text Name and define a text-input widget with the name set to name.

    2. Repeat the above step to define two more text-input widgets labeled Phone and Address using appropriate names (we recommend using all lower-case for the names).

    3. Inside of another paragraph, define a select widget with the label Store Location: and name location. The option values should be the four store locations (East, West, North and South).

    4. Inside of a paragraph, write the text Pizza size:

      Inside of another paragraph, define a radio widget with name set to size and value set to small and then write the text Small.

      In a similar fashion, define two more radio buttons for medium and large pizzas. The Large entry should be pre-checked.

    5. Finally, in yet another paragraph, define a Submit button with value set to Order Now!

    6. In the Project Explorer, right-click on orderform.html and choose Run As - Run on Server and examine your form. It should look something like:
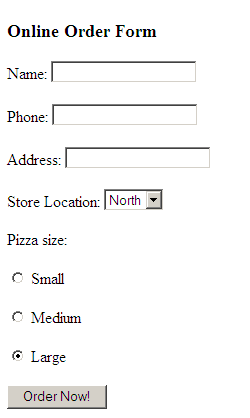
      You can enter data and choose a location and size, but don't submit the form (you don't have a program to handle the submission).

      In particular, note that when you select a radio button, the previous selection should de-select.

Part 2: Working with JavaScript

In this part, you will write some simple JavaScript to ensure that the user fills in required fields in the form.

Steps:

  1. Edit orderform.html and add an asterisk in front of the Address text-field label. Then add a new paragraph above the form that reads:

    * - Required Field         
             

  2. Modify the form start-tag so that the form has a name of OrderForm and a onsubmit attribute of return validateOrderForm().

  3. In the head section of the page, write JavaScript that checks to see if the address field has any text in it and shows an alert if it's empty.

    Use the sample JavaScript program in the course notes for guidance, but be sure to change the names of variables, etc. as appropriate.

  4. To test your JavaScript, run the page on the server, and press the Submit button without entering an address -- you should see an alert message box. Note that this checking should work even though we don't have a server program to handle the page: that's because the JavaScript program runs within the client browser.

Part 3: Using Cascading Style Sheets

In this part, you will write a cascading style sheet that governs the overall appearance of your Web site.

Steps:

  1. Right-click on the WebContent folder and choose New - CSS File. Name the file general.css.

  2. Write a CSS rule for the h1 tag with the following properties:

    font-family:            sans-serif;
    color:                  olive;
             

  3. Write additional CSS rules for the following tags:

     h2
    ----
    font-family:            sans-serif;
    color:                  navy;
    border-bottom:          medium solid navy;
    
     p
    ---
    font-family:            Verdana,Arial,Helvetica,sans-serif;
    
    p.footer
    -------
    font-family:            Verdana,Arial,Helvetica,sans-serif;
    font-size:              xx-small;
    text-align:             center;                  
             

  4. Next, update your index.html so it references the external CSS file. Use the Web browser to examine the results.

    Then update the copyright paragraph so it uses the p.footer style.

  5. Repeat the above for the rest of the pages on your Web site.

  6. As in the last lab, run the index.html file on the server and test your Web site.

  7. Change the stylesheet so that the h1 text is red, rather than olive. Then retest. How easy was it to modify the look of an entire Web site?

Part 4: Optional - Write a Form-Processing Servlet

The most basic way to process HTML forms in Java server-side is the servlet - in this part, you will write a simple servlet to respond to the orderform.html form.

Steps:

  1. Run a RAD "wizard" to create the servlet:

    1. Right-click on the Lab02Web project and choose New - Servlet to start the wizard.

    2. On the first wizard page, for the Java package, enter servlets.

      For the Class name:, enter OrderPizza, then press Next.

    3. On the next page, examine the defaults, then press Next.

    4. On the next page, remove the checkmark from the doGet box, then press Finish. RAD creates the Java class for the servlet and opens it into the editor.

  2. Complete the servlet so it processes the form. All of your work will be in the doPost method (recall that your form's action is post.

    1. Within doPost method, first set the content type and obtain a PrintWriter:

      response.setContentType("text/html");
      PrintWriter out = response.getWriter();             
                   

      Use the Source - Organize Imports menu to get rid of the compile error on the PrintWriter type.

    2. Retrieve the form parameters (the data the user entered) from the request:

      String name = request.getParameter("name");
      String address = request.getParameter("address");
      String phone = request.getParameter("phone");
      String location = request.getParameter("location");
      String size = request.getParameter("size");
                   

      Note that these match the names you assigned to the input widgets in the form.

    3. As a quick test, just output the values to the server's "console":

      System.out.println("Name: " + name);
      System.out.println("Address: " + address);
      System.out.println("Phone: " + phone);
      System.out.println("Location: " + location);
      System.out.println("Size: " + size);             
                   

      In a real-world application, the servlet would process the input perhaps storing the info into a database and then emailing the location so it can start preparing the pizza.

    4. Output a simple confirmation message back to the browser:

      out.println("Thanks, " + name + ", your pizza is on its way!");		             
                   

  3. To test, run orderfom.html on the server, then fill in the form and submit it.

    You should see your confirmation message in the browser, and if you look in the RAD console view, you should see the "server-side" output from your servlet.

Part 5: Optional Challenge

Steps:

  1. Use a borderless table (border="0") to organize the display of your form so that the text-input widgets line up nicely.

  2. Update your JavaScript so that it checks for the Name and Phone text-input widgets as required. The alert box should display all of the missing fields (i.e. there should only be one alert() call in your JavaScript).