Use Windows Explorer or My Computer to navigate to the
{Eclipse Installation Directory}.
If your computer is running Windows XP and has the standard
lab setup, this directory is:
c:\java\eclipse
If your computer is running Windows Vista, Windows 7 or later,
the directory is:
c:\Users\username\java\eclipse
Note: Be sure to substitute your computer's actual
username, e.g. librtrain for the "username" above.
Start Eclipse running by double-clicking on eclipse.exe.
When prompted for the Workspace, browse to
{Lab Installation Directory}/workspace, then press OK.
If your computer is running Windows XP, and has the standard
lab setup, the correct directory is:
c:\javaclass\workspace
If your computer is running Windows Vista, Windows 7 or later
and has the standard lab setup, the directory is:
c:\Users\username\javaclass\workspace
Note: Be sure to substitute your computer's actual
username, e.g. librtrain for the "username" above.
Close the Welcome window by clicking on the 'X' in its
titlebar.
We also recommend running Eclipse as a maximized window.
Eclipse supports the notion of perspectives, which are
sets of window panes that let you work in a particular role.
For this lab, you will work in the Java
perspective, which contains window panes that let you
create and edit Java programs.
Open the Java perspective by choosing Window -
Open Perspective - Java.
Configure Eclipse to separate your source and class files
into different directories:
From the Eclipse menu, choose Window - Preferences,
then exand the Java category and click on
Build Path.
Ensure that the Folders radio button is
selected, then press Apply followed by OK.
Your first job is to create a new project for your
lab. Follow these steps:
Choose File - New - Java Project,
Then press Next.
On the Java Project Page, enter Lab01
for the Project name, then press Finish.
You should see the new project in the Package
Explorer pane. Expand it and note that it's
empty except for a reference the Java Runtime
Environment (JRE) and a src folder.
The basic building block of a Java program is
the class. Now you will use a wizard
to create a class for your program. Follow these
steps:
To start the wizard, right-click on the Lab01
entry in the Package Explorer and choose
New - Class.
On the first wizard page, enter lab01 for
the Package. A package is an organizational
unit for Java classes. By convention, Java
package names start with a lower-case first
character.
For the Name, enter HelloWorld.
By convention, Java class names start with
an upper-case first character.
Near the bottom of the page, put a checkmark
in the box labeled public static void main(String[] args).
This will cause the wizard to create a main method
for you which will act as the starting point of your
program.
Then press Finish. Note that the new package name
and class appear in the Package Explorer and that
Eclipse opens the new class's source code into the
Java editor.
Using the course notes as a guide, complete the class
so it prints "Hello, world" to the console.
Press Ctrl+S or choose File - Save to save the
class -- Eclipse compiles the Java code whenever you
save it.
To run your program, right-click on the class
in the Package Explorer, then choose Run As -
Java Application.
You should see the "Hello, world" text in the Console
pane at the bottom of the Eclipse window.
Part 2: Compile Errors
In this part, you will introduce some errors so you will
be able to fix "real" errors in later labs. When you get
each error, note that Eclipse's Problems view shows you a (hopefully) informative
diagnostic message.
Steps:
Now let's introduce a compilation error. Follow these steps:
In the HelloWorld.java editing window, change the class name
from HelloWorld to Test, then save the file.
This will cause an error, since Java requires class names
to match file names.
Note the many ways Eclipse lets you know there's an error:
The editing window's titlebar shows a red 'X'
In the Package Explorer, the project, package and
class entries all display a red 'X'
In the editing window, there's a red 'X' in
the left gutter on the line that has the error
In the editing window, there's a red squiggly
underline beneath the offending code
The Problems view at the bottom of the window shows
an error message (you may need to click
on the Problems tab to surface the Problems
view instead of the Console). Note that you can hover the mouse
over the error message if it's cut off in the
Description column. You can also resize the
columns by dragging the column heading
In this small program, it's easy to see exactly where
the error is, but it's not so easy in a larger program.
The best way to navigate errors in a large program is
to double-click the error message in the Problems
view -- try it and note how Eclipse positions the editing
cursor on the line containing the error.
To fix the error, change the class name back to
HelloWorld, then save the file -- all of the
red 'X' indicators should disappear.
Important: You can never run a program until
you have fixed all of the errors!
Run the program. Right-click on the class
in the Package Explorer, then choose Run As -
Java Application.
You should see the "Hello, world" text in the Console
as before. (Note how the Console pane automatically
surfaces whenever a running program creates console
output.)
Introduce another error by changing System.out.printlin
to System.out.Println (note the upper-case 'P').
Save the file. What
error does this cause? Fix the error before continuing and
run the program again to test it.
Remove the last closing bracket ('}') in the file and then save.
What error does this cause? Fix before continuing and run
the program again to test it.
Change the main method's name to Main (note the
uppercase 'M') and save. Does that cause a compile error? Try
running the program. Any problems? Fix, save and re-test.
Remove the square brackets ('[ ]') from main(), save and
retest. What does all of this tell you about the main() method?
Part 3: Reading JavaDoc
In this part, you will learn how to use the documentation for the
Java class library, such as System.out.println. This documentation
is HTML-based, and is known as JavaDoc.
Steps:
Open the JavaDoc and set its home page as a favorite
by following these steps:
Open a Web browser and navigate to:
http://docs.oracle.com/javase/6/docs/api
Use your browser's facilities to set this page as a favorite
or a bookmark.
Use the following steps to find the documentation for
the System.out.println method you've already
used:
The JavaDoc documentation is divided into panes; the left-most
panes contain a list of packages and classes (Java classes are
normally organized into groups referred to as packages).
The upper-left pane contains the package list, while the
lower-left pane shows the classes in the selected package.
When you first open the documentation, the All Classes
link has been pre-selected in the package pane -- that
means that the class pane shows all classes, regardless
of package.
In the package pane, find the java.lang package and click on
it -- the classes pane should update with a list of the interfaces
and classes from that package. Scroll down to find the System
class. The main pane then contains the documentation for the
fields (variables) and methods in the System class.
In the main pane, scroll down to find the out field, then
click on it. The documentation should scroll to a description
of that field. What is the type of this field? Note that you
can click on all underlined phrases to hyperlink to additional
documentation.
Click on the PrintStream link (if you haven't already
done so). In what package does the PrintStream class reside?
Find the println method(s). Why are there so many? What
do they do? Which one did you use in the previous part of lab?
Now notice that at the top of the main pane, there's an Index
link. Try using it to find the System class. Then try using
it to find the println method. Do you see how the index
could be useful if you know the name of a method or field, but don't
remember in which package and class it resides?
To test your documentation-reading skills, answer the following questions:
In which package does the JButton class reside?
What are the arguments to the elementAt method in the Vector class?
Part 4: Working with Eclipse
In this part, you will learn more about the Eclipse development
environment.
Steps:
Eclipse stores programs in a workspace directory --
you specified the workspace when you started Eclipse.
If you want to work with Java code that exists outside
of the workspace directory, you can import it
into a project within the workspace.
Let's start by importing a slightly more complicated
program than your "Hello, World" application. Follow
these steps:
In the Package Explorer,
right-click on the Lab01/src folder and choose
Import... to start the Import wizard.
The first wizard page lets you choose the import source --
note that Eclipse can import many different types of code
and data.
The files you will import are simple files, so choose
General - File System and press Next.
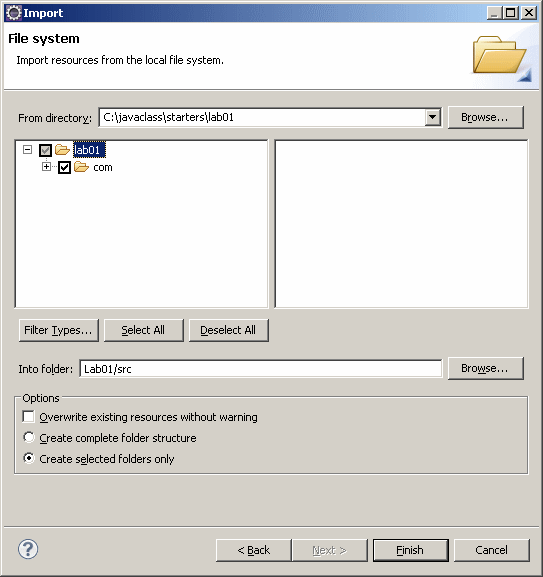
The next wizard page lets you choose the directory
from which the files will be imported, the project
into which the files will be imported and various
options.
For the From directory, press the Browse
button and navigate to {Lab Installation
Directory}/starters/lab01. If your computer has
the standard lab setup on Windows XP, this is:
c:\javaclass\starters\lab01
If your computer has the standard lab setup on Windows Vista
or later, the directory is:
c:\Users\username\javaclass\starters\lab01
Expand the checkbox on lab01 and put a checkbox
next to the com folder. The wizard should look
something like:
Press the Finish button to import the file.
Expand the Lab01/com.descriptor.javautils folder --
you should see the imported Java2UML class. There should
be no errors at this point. If you see errors, right-click on the
imported file and delete it, then try importing again, following
the instructions as closely as possible.
The imported class displays information about a Java class,
formatting it using Unified Modeling Language (UML) syntax.
Open the class into the editor by double-clicking on it.
At this point in the course, we don't expect you to
understand all of this Java syntax, but
go ahead and examine it and see if makes any sense.
Now let's experiment with Eclipse's font settings.
Follow these steps:
From the Eclipse menu, choose Window - Preferences
and then expand the General - Appearance category and highlight
the Colors and Fonts entry. In the right-hand pane, expand
the Basic entry.
Choose the Text Font entry and press the
Edit button -- try Lucida Console,
Regular, 12 point, then press OK
twice. Note how the editor's font changed.
If you don't like that font, go back and change
it to something you like!
Now let's experiment with the Outline view -- you should
see it on the right side of the Eclipse window. If you don't
see it, choose Window - Show View - Outline.
The Outline View shows your class's features, especially
its methods. Click on a method name in the Outline and note
how Eclipse scrolls the editing window so the method is visible.
In this small program, that's not very useful, but as your
programs grow, the Outline View becomes very handy.
Now let's rearrange the views, just so you can see how
it's done. Click on the title bar for the Outline View and
drag the view over the Package Explorer pane on the
left side of the window. When you drop it, note that Eclipse
now shows the Outline View in that pane but that the Package
Explorer is available by clicking on a tab at the bottom
of the pane.
Click on the Outline View tab to surface it and
then click and drag its titlebar downward until the mouse
cursor changes into a down-arrow icon, then let go of the mouse.
Note how Eclipse now draws the Outline View as a separate
pane so you can see it and the Package Explorer at the same
time.
Experiment dragging and dropping views to customize Eclipse
the way you might like it. If you accidentally "lose" a view,
you can get it back by choosing Window - Show View.
Now let's try running the program. Right-click on the class in the Package
Explorer and then choose Run As - Java Application.
What happens? This program requires a command-line argument
that specifies the name of the class to print. To supply
the argument, follow these steps:
Right-click on the class and choose
Run As - Run Configurations to display the Run configurations
wizard.
In the Configurations list, highlight
Java Application and press the New button.
The wizard shows information about this Run Configuration.
Click the Arguments tab, and in the Program
arguments field, enter java.util.ArrayList -- this is
the class we will display.
Press Apply and Run -- note how the
Console view shows the methods in the ArrayList
class. You should verify this list by looking in the
JavaDoc.
You can maximize any window pane by double-clicking on
its titlebar -- try it with the Console.
To restore the pane to its normal size, double-click
on the titlebar again.
Part 5: Debugging
In this part, you will experiment with Eclipse's Java debugger.
Steps:
Eclipse defines the notion of perspectives, which are
groups of views geared toward a particular task. So far,
you have been working in the Java perspective, which provides
views for editing and navigating code. Now you will use
the Debug perspective, which provides facilities
to diagnose problems and understand how your program
executes.
To switch to the Debug perspective, choose Window -
Open Perspective - Debug.
Note that you can quickly switch between perspectives
by clicking on the icons arranged horizontally across the
top right side of the Eclipse window.
The key window panes in the Debug perspective are the
Debug view, which is in the upper left, and the
set of views in the upper-right pane organized as tabs: Variables
and Breakpoints. Try clicking on the tabs
to surface each view.
Note that the Debug view pane's titlebar contains
icons for debugging commands, such as Resume,
Step Over and so forth. Hover the mouse over the icons
to see the command name (some may be grayed out).
The Debug view keeps a record of the programs that
you've previously executed. To clear the list, right-click
on the Debug view pane and to display a popup menu and
choose Remove All Terminated.
Note that there are grayed-out commands on the popup menu to
let you terminate running programs -- this is handy if you
ever have a program get into an infinite loop!
Now let's set a breakpoint. Follow these
steps:
In the Java2UML
source window, find the line containing the first if statement.
In the left gutter for that line, double-click -- Eclipse
draws a circle to indicate that this line contains a breakpoint.
Also note that the new breakpoint shows up in the
Breakpoints view (this view is a tab in the upper-right
window pane).
From the Eclipse main menu, choose Run - Debug and note
that Eclipse selects the Run configuration you configured
previously.
Eclipse executes the program until the breakpoint is
reached. Note how the Java2UML source window has the
breakpoint line highlighted and that there's an arrow
in the gutter.
Also note that the Debug view has an entry for the
application being debugged.
Now that execution has stopped before executing the highlighted
line, you can examine variables and perform other
debugging tasks as necessary. To examine the contents
of the command-line argument variable, follow these steps:
Click on the Variables tab in the upper-right
window pane.
At this location in the program, there's only one variable
defined -- the args command-line argument array (we will
cover arrays in more detail later). Keep expanding
the "+" symbols until you see the characters that
make up the command-line argument string: 'j', 'a', and
so forth.
Next, let's try single stepping. Find the icon on the
Debug view's titlebar that says Step Over and click it.
Note how the highlighted line moves in the Java2UML source
pane to show which line will be executed next.
Also, note how the first single-step skipped the "if" statement body since the
"if" expression is false.
Keep stepping over until the highlight is on the line:
Method method = methods[i];
Look in the Variables view -- how many variables are
available at this point in the program?
The current line is inside of a for loop. Debugging
loops by single stepping can be tedious, so let's try a
different technique:
Set a breakpoint on the line:
sb.append("(");
On the Debug View titlebar, press the icon for
Resume -- this causes the program to execute
until the breakpoint.
Find the sb=StringBuffer entry in the Variables
tab and highlight it to display its contents. What's
the name of the first method that this program processed?
Press the Resume icon again. What's the name of the
second method? (Note that it might the same as the first - Java allows
a class to define multiple methods with the same name as long
as the method's arguments are different.)
Repeat this process four or five times and write down
the method names.
Remove the second breakpoint either by double-clicking on the
circle in the gutter or by using the Breakpoints view.
Press the Resume button -- since there are no more
breakpoints in the flow, the program will run to
completion. Note how the entry in the Debug view
indicates termination.
Examine the Console view, scrolling up as necessary to
see the names of the methods that this program processed.
Note that they will not be in the same order since the
program sorted them alphabetically.
Remove any remaining breakpoints.
Set a breakpoint on the line:
Collections.sort(methodList);
Restart the debugger by choosing Run - Debug.
Use the Variables view and single-stepping to see
the methodList elementData before and after sorting.
Note how Eclipse displays changed variables in a different
color.
Switch back to the Java perspective when you are finished.
Part 6: Reinforcement
In this part, you will repeat the procedures learned in
earlier parts, this time with minimal instruction. By re-reading
and repeating the steps, you will better remember how to
do them in future labs.
Steps:
Create a new Java project named Lab01Reloaded.
In the new project, create a class named PrintPI
in the extra package. The new class should have
a main method.
Use the JavaDoc to find information about the Math class.
In the new class's main(), write Java code to display
your name on one line, your title on the next,
and the value of pi on the next.
Hint: To reference a static final field, you use syntax like
classname.fieldname, for example, Math.PI.
Compile and test your program.
Debug your program, set a breakpoint on the
first output line then single-step through it.