The project you will deploy will be based on the Lab08 project, which used arrays and collections. In particular, you will test the part4 program that displayed distances between cities.
Find the IowaDistanceMatrix class in the Lab08/part4 project and examine the code so you can remember how it works.
Note: If you did not finish this lab, ask your instructor how to obtain the solution.
Create a new project named Lab12 and copy the Lab08/part4 package to the new project's src folder.
Open the copied IowaDistanceMatrix.java class into the editor.
Modify the main method so that it accepts the names of the two cities as command-line arguments and then calls the distance method.
If the main method is not passed two arguments, the program should display an appropriate message and exit.
Here is some code to get you started:
if (args.length == 2)
{
    String city1 = args[0];
    String city2 = args[1];
    . . .
}
else
    System.out.println ("Two cities required");
Run the program as a Java application in Eclipse to test your argument-count checking -- you should see your error message in the Eclipse console.
In the Package Explorer, right-click on IowaDistanceMatrix.java then choose Run As - Run Configurations and press the Arguments tab, then set the Program arguments to "Des Moines" Keokuk (the double quotes are required).
Press the Run button -- you should see the distance "202" in the Eclipse console.
Now let's export from Eclipse to the file system. Follow these steps:
-
In the Package Explorer, right-click on the Lab12 project and choose Export....
-
On the first wizard page, choose General - File System, then press Next.
-
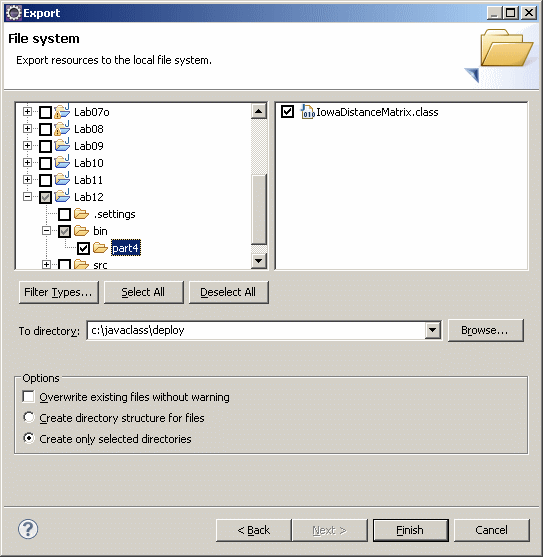
On the next wizard page, first uncheck the Lab12 entry, then expand it.
Expand the bin entry, then put a checkmark on the part4 entry. Then click on the part4 entry to highlight it, and note that IowaDistanceMatrix.class shows up in the right column.
For the To directory, enter {Lab Installation Directory}/deploy. On Windows XP, this directory is:
c:\javaclass\deployOn Windows Vista or later, the directory is:
c:\Users\username\javaclass\deploy -
Make sure that your dialog matches the screen shot in Figure 1, then press Finish. When asked to create the target directory, answer Yes.
From the Windows Start menu, choose Run and enter cmd.
In the resulting command-prompt window, change to the deployment directory and examine the files. On Windows XP:
cd \javaclass\deploy
dir
dir part4
On Windows Vista or later:
cd \Users\username\javaclass\deploy
dir
dir part4
You should see IowaDistanceMatrix.class in the part4 directory.
To run the program, enter:
java part4.IowaDistanceMatrix
You should see your argument-count error message.
Try again:
java part4.IowaDistanceMatrix "Des Moines" Keokuk
You should see the distance between the two cities.
Here's what you should've learned from this part:
- Packages (e.g. part4), correspond to directories on the file system
- To run a Java program, the current directory must be "above" the package directory
- When you run, you specify the package name(s) and class name, separated by a period
- You do NOT specify the .class extension when you run the program